Monday, October 31, 2011

FRANKENSTEIN!

Happy Halloween for the last time this year! I'm getting ready to head out trick-or-treating with my nephews! I love my Frankenstein nails and simple and cute they are. 

My base is Avon Limeade which I then mattified with Hard Candy Matte-ly In Love. I used Sinful Colors Nail Art stripers for the black lines.


I hope you enjoyed my Halloween posts today! Make sure to check back tomorrow! I will be starting a series of posts featuring my new Ozotic Mish-Mash polishes that are holographic and multi-chrome!

Happy Halloween and be safe tonight!

Avon Limeade

Hello again everyone! This is a polish I picked up on a whim out of the Avon Outlet book for $1.99. SWEET! I really like Avon polishes, they have really improved their formula and colors over the last few years. This is the base color for my last Halloween nail art post...can you guess what art I did over this?

This is a really pretty light lime green foil...it was a little on the sheer side. What you see here is 3 coats topped with Orly Sec 'N Dry. (This polish is a Speed Dry so I probably didn't need the speed dry top coat but I was in a hurry. LOL)


Stay tuned! I will have my art post up in a few minutes! (hopefully) LOL

Mom's Candy Corn Mani!

Happy Halloween everyone! I have 3 posts that I am planning on doing today but it's been a crazy day and is going to get crazier so please bear with me!

I went back to my favorite nail art technique for this mani....sponging! I love candy corn nails! I had done them on myself earlier in October but it was before I started blogging so I wanted to do them again and show you guys! 

For this mani I used Sally Hansen White Tip, Revlon Tangerine and China Glaze Solar Power. For her ring finger I used a waterslide nail decal that features Snoopy sitting on top of a Jack-O-Lantern (I love "It's The Great Pumpkin, Charlie Brown"). All nails were topped off with Orly Sec 'N Dry. I hope you like this mani as much as I do!

 There was candy corn harmed (or eaten) during the making of this photo. ;) LOL


I hope you enjoyed this mani!

Saturday, October 29, 2011

Mummy Time!

Happy Saturday everyone! I attempted another tape mani late last night. It took me about 4 hours and I am still not happy with it. LOL But since it did take so long I felt I had to post it. 

I followed another tutorial from nailside that I thought was so cute. Unfortunately, mine did not turn out nearly as good as hers. (You can see her tutorial here.) I think my problem was in the color I chose to put over the tape - it is a dark color and I needed to put it on pretty thick to get it opaque. This was very problematic for peeling off my tape...which resulted in jagged edges instead of clean lines. But, that is kind of mummy-ish, right?! I mean, their wraps do not have clean lines. LOL It looks worse in the pics than it does in real life. Close-ups are not good for problematic manis. 

I used Sally Hansen White Tip for my base color (I am not a big fan of this polish, it was very streak and I had to put it on pretty thick) and China Glaze Naughty and Nice for my wrap lines. 


So, what do you think of my mummy nail art? I hope you like it!!! I wish my lines were cleaner.

Friday, October 28, 2011

Sparkly Gradient Halloween Mani!

Happy Friday everyone! I am so glad it's almost the weekend! I have a busy one planned...I will try to post every day but I'm not sure I'll have the chance. I have some good manis planned out in my head so I hope I have time! 

Today I have another post featuring my mom. As I've said previously, I do her nails as often as I do mine so it only seems right to feature her nails on here occasionally. LOL I wanted to do something fun and sparkly and I was in the mood to sponge. I love sponging, it is one of the few nail art techniques that I can actually pull off. I believe anyone can do this - it just takes a little practice. 

As a "bonus" to this post I will add a pic at the bottom of my first ever gradient sponging mani. Please keep in mind this was from awhile ago (way before I started blogging) and my picture-taking skills were non-existent so the picture is very blurry, but it does show that someone who's never done this before can do a good job!

For this mani I started out with a base of Sinful Colors Courtney Orange (I have a love/hate relationship with this polish...I love the shade of orange that it is but is takes several coats to become opaque) and then for the sponging I used Sally Hansen Black Out on the tips with Zoya Faye and Zoya Gabrielle in the middle to soften the line and add sparkle. I topped it off with Seche Vite - not my favorite top coat but it's good to use with nail art since it is so thick.


For this one I used a base of NOX Twilight in Poseidon and did the sponging in China Glaze Dorothy Who? and Zoya Charla. It reminded me of mermaids and ocean waters. :)

I hope you enjoy gradients! You'll probably see a lot more of them from me!

Thursday, October 27, 2011

Halloween Explosion!

Finally a new nail post! I wanted to do something fun and still Halloween-related. I tried several different Halloween designs only to be reminded that I fail at anything art-related. So, I decided to do a tape mani that I have done before with different colors.

I followed the tutorial from the amazing blog Nailside (see the tutorial here). She has some amazing designs and easy to follow instructions. Since I wanted to make it Halloween-themed I used black and orange (original, I know lol). For my orange I used 3 coats of OPI Ya'll Come Back, Ya Hear? and for my black I used 1 coat of Sally Hansen Black Out. I finished this mani off with Seche Vite. My edges look a little jagged in the pics but they looked clean to the naked eye. Darn macro setting. 


What do you think of my Halloween explosion? I think it's super fun!

Thanks so much for following and reading!
Don't forget to check out my Facebook page!

Tuesday, October 25, 2011

Legend of Zelda inspired nails with Zoya Midori

Hello everyone! Today is my 2-week blog anniversary! Is that a blogaversary? LOL Anyway, I never dreamed in 2 weeks I would have 76 followers already! Thank you all so much for following me, and I hope you enjoy my blog!

Today I have a post that is special to me, and is still semi-Halloween related. My nephew is going to be in an Orchestra concert tonight (he is in middle school) and the kids are wearing their Halloween costumes. They're calling it a Spooktacular! My nephew is dressing up as Link, from 'The Legend of Zelda' video game (this is the second year in a row he has been Link, he's obsessed with everything Zelda). So, in honor of him, I decided to do Legend of Zelda  nails! As you saw in my post with the GOSH Holographic spiderwebs, I am not talented at nail art and I knew I could not pull these off by myself.  I decided to have my brother (who actually has art skills) do the nail art on this one. 

I painted my nails in Zoya Midori (this color scream Legend of Zelda to me) which bubbled. :( The bubbles weren't as noticeable on my right hand so I took the pic of Midori on its own using that hand. Midori is a lovely light green with gold shimmer running through it. The gold does show up a little more in the bottle than on my nails though. For the nail art we used the Sinful Colors Nail Art Stripers in Flower Girl (gold), Time Off (black) and Lagoon (blue).

As far as the nail art goes, I have an arrow on my index finger, the Master Sword on my middle finger, the TriForce on my ring finger and an Ocarina on my pinky (my thumb was being a problem and it was getting late so I don't have any art on my thumb). Don't know what a TriForce and Ocarina are? I'm sure you are not alone. LOL You can click on the following links to learn more if you like - click here for info on the Triforce and here for info on what an Ocarina is.

My brother did get inspiration for the sword and the ocarina from an image we found on Tumblr. Her Legend of Zelda nails were amazing. If you would like to see those click here.


Zoya Midori


I hope you all enjoyed this post and it's not too video-game centered. I think this post will mean a lot to my nephew. :)

Monday, October 24, 2011

Black And Red Glitter Gradient

Good morning everyone! Today's mani is pretty simple but I really love it. I still wanted to do something semi-Halloween related but simple. I think this qualifies. :) 

I bought a China Glaze a few months back called Lubu Heels but hadn't worn it yet because I was saving it for Fall and then I almost forgot about it. After getting my Wet 'n Wild Behind Closed Doors (from the On The Prowl Collection) it jogged my memory and they seemed like a match made in Heaven. Behind Closed Doors is a very sheer greyish-black packed with red micro-glitter as well as red hex glitter.

I am disappointed in Lubu Heels. In the bottle it looks like a black jelly base packed with red micro-glitter. You can BARELY see the red on the nail. :( It did have good coverage, I only needed 2 coats (I was in a hurry when I did this and I didn't have time to get pics of Lubu Heels by itself but I do have a close-up of the top of my nail that is Lubu Heels only). I love Behind Closed Doors but it's very sheer. If you were to wear it on its own you would need 4 coats. (My friend Sarah at Chalkboard Nails did a post on this color on its own - you can see it here if you like). Like most glitters of this nature it is better to sort of "dab" it on your nail instead of painting it on, especially if you're trying a gradient like I was. 

All of these pics are outside but it was pretty cloudy this morning (YAY!). This is 2 coats of Lubu Heels, 2-3 gradient coats of Behind Closed Doors (starting about 2/3 of the way up on my nail) and it was topped with Orly Sec 'N Dry.


Apparently I either bumped my middle finger while it was wet or this is from my "dabbing" motion with the glitter. I didn't notice it till I was cropping the pics. Grrr

See the TINY red flecks at the very top of my nail? That's Lubu Heels and it was only noticeable outside.


I hope you liked this mani! Does it remind you of Halloween at all? It reminds me of vampires for some reason. LOL

Sunday, October 23, 2011

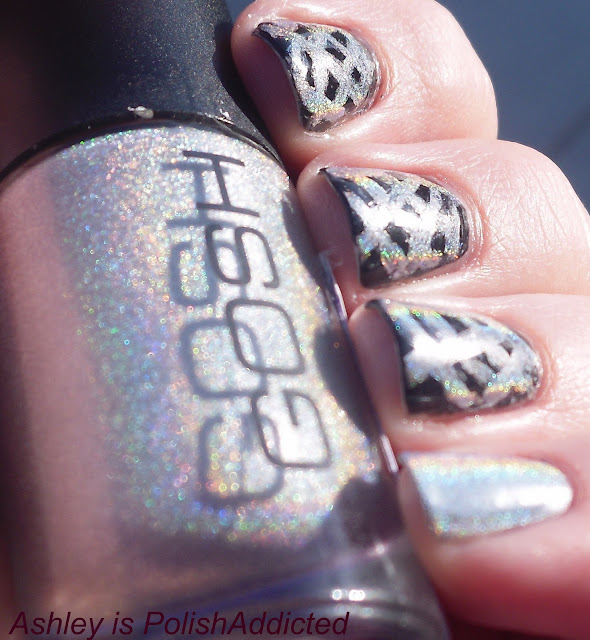
GOSH Holographic Halloween Nail Art!

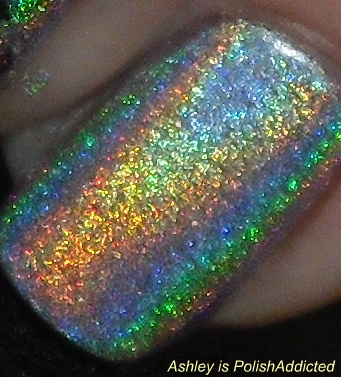
Hello lovelies! I hope everyone is having a fantastic weekend! Mine has been super busy which is why I didn't post this yesterday. Today I have my second post on GOSH Holographic (if you missed my first post you can see it here).

When I received my GOSH I knew I wanted to use it right away but I also wanted to do some sort of Halloween mani. I thought holo spiderwebs would look awesome. I was right except that I, unfortunately, fail at nail art - well any kind of art, really. I am one of those people you do not want to play Pictionary with, I have a hard time drawing stick people. LOL Keeping that in mind, I am fairly happy with how these turned out. I had to go over them 3 times (I did it twice but after I added top coat it dulled my holo so I had to do a third coat) so they are a little thicker than when they started out. I think I also need a thinner brush. I have recently seen a striper brush from one of my fellow blogger friends, Jacki at Adventures in Acetone, and I think I will get one of those before I attempt any more nail art. My pinky did look very good....until my top coat of Seche Vite smeared it, I don't think I had a thick enough drop on my brush. I tried fixing it but it looked awful so I decided to just put on solid GOSH for my pinky and thumb.


Inside with flash...


Outside...


Isn't this polish just amazing?! What do you think of my semi-failed attempt at nail art?

09 10