Showing posts with label Christmas. Show all posts

Thursday, December 1, 2016

Indie Spotlight: Paint Box Polish with Harry Potter-Inspired Christmas Nail Art


Hello! This month's Indie Spotlight brand is one of my personal favorite brands - Paint Box Polish! This also happens to be my first Christmas nail art of the season. I figured December 1st was a good day to kick off Christmas manis! I used three different Paint Box Polish shades to create this look. Keep reading to find out more!


Thursday, December 24, 2015

Merry Christmas Eve - My Mom's Christmas Mani


Merry Christmas Eve to all who celebrate! I just have a quick post to show you the Christmas nail art I did on my mom last night. I haven't done my Christmas mani yet, I'm hoping to do something later tonight though! In the meantime, I thought I'd share this one with you. I think it turned out really fun!


I wanted to make a fun Christmas skittle so I included Santa, Rudolph, a candy cane, a Christmas tree and a wreath! All of the designs were created using acrylic paint.


There were a few details I still needed to add but it was very late so I left them to finish the next day. I still think they turned out pretty cute!

I hope all of you who celebrate have a wonderful Christmas filled with love!


.

Saturday, December 5, 2015

40 Great Nail Art Ideas: Glitter or Flake Topper


Happy Saturday! My nephews are here today and we are going to decorate for Christmas so I am super excited! But first I wanted to get a quick post up for my nail art challenge this week. The color theme this week is "glitter or flakie topper" and my pattern was "half and half." I knew I wanted to make it Christmas-themed, but with a twist. I'm pretty happy with how it turned out!


Thursday, December 18, 2014

Ornamental Glow

Nothing to Disclose

Happy Thursday! It's hard to believe it's only one week until Christmas! I am more behind this year than I have ever been. I will be finishing up my shopping this weekend, and there are still a few decorations I haven't put up yet! I am usually pretty early and on top of everything so it's driving me crazy to feel like I'm behind. But it will all get done, right?! 

And because I've been so busy, I haven't had much time for blogging or nail art, which makes me sad. I have so many ideas floating around in my head but haven't had time to sit down and execute them. BUT, I did have a little bit of time (late on Saturday night) to try a radial gradient. Well, try again. This was my 3rd attempt at a radial gradient and the first one I've been happy with!


Post continued after the jump!

Saturday, November 29, 2014

Sparkly Holiday Gradient featuring Q-tips Precision Tips

Sponsored

Hello lovelies! Now that Thanksgiving is over here in the US, it is officially time for me to start creating Christmas manis! When I was asked to participate in the #beautyQtips Holiday Glam Campaign I was very excited to share how Q-tips Precision Tips can help everyone create a gorgeous manicure for the holidays or any time of the year! 


I really enjoyed using the Q-tips Precision Tips to clean up this gradient. They were soft and gentle on my skin and the stick was flexible, yet strong enough to do a great job.  The precision tip worked really well to clean up without ruining my manicure. 


I had never used the Q-tips Precision Tips for cleanup before so I decided to put them to the best test I could think of - a vampy red and glitter gradient.  I started off with a base of vampy red. Once it was dry I used a makeup sponge to create the gradient (see image below).


After creating the gradient I was left with the mess below. If you have ever cleaned up red and/or glitter, you know this is not an easy task! So let's see how well the Precision Tips worked!


I used the Precision Tips dipped in pure acetone for the cleanup. After I was done cleaning up I used the Precision Tips again, this time to apply a thick hand cream to my skin and cuticles to replace the moisture I lost using the acetone.


I am happy with the results below! I will definitely be using Q-tips Precision Tips for more manicures. And, after looking at @qtips on Instagram, I will also use them to create fun eye makeup and lipstick looks!


If you would like to re-create this look using Q-tips Precision Tips, I used NCLA Rodeo Drive Royalty as my base and Darling Diva Polish FFF for the silver. 


Do you use Q-tips as part of your beauty routine? If not, I suggest you try out the Precision Tips. I will definitely continue using them! Make sure to check out Q-tips on Instagram for even more holiday glam looks!

Thanks for reading and happy polishing!


Disclaimer: This post was sponsored by Q-tips. All opinions are my own. 


.


Thursday, December 26, 2013

Christmas Nails 2013

Nothing to Disclose

I know it's the day after Christmas so I am a day late with this post but I didn't get a chance to post this mai yesterday and I wanted to share it with you. Better late than never, right? 

For this mani I used Elevation Polish Limestone as my base (my shirt was cream and gold so this went with it perfectly!). I used striping take and Kiko Sugar Mat 643 for the trees and Zoya Solange and Tomoko for the "ornament strings" with glequins for the ornaments. I had no idea what I was going to do when I sat down to do my nails so I was pretty happy with how it turned out considering I started from scratch!


I hope you all had a wonderful holiday season and I'm looking forward for what the new year has in store!


Thanks for reading and happy polishing! ♥

.

Tuesday, December 24, 2013

Christmas Plaid!

Nothing to Disclose

Merry Christmas Eve to everyone who celebrates! I have been sick for the past week and between that and the normal last minute Christmas rush, I haven' had much time for my nails. In fact, I've been completely naked for the past 3 days! *GASP* I am hoping to do one last Christmas mani later though, as well as one on my mom. 

But for now, this is the only Christmas mani I've done in the past 2 weeks. I was really happy with it though!


 Post continued after the jump!

Tuesday, December 25, 2012

Merry Christmas with Chanel Malice and a Little Nail Art!

Merry Christmas readers! I know Christmas is over for many of you by now but this is the first chance I have had to show you what I wore on my nails today. 

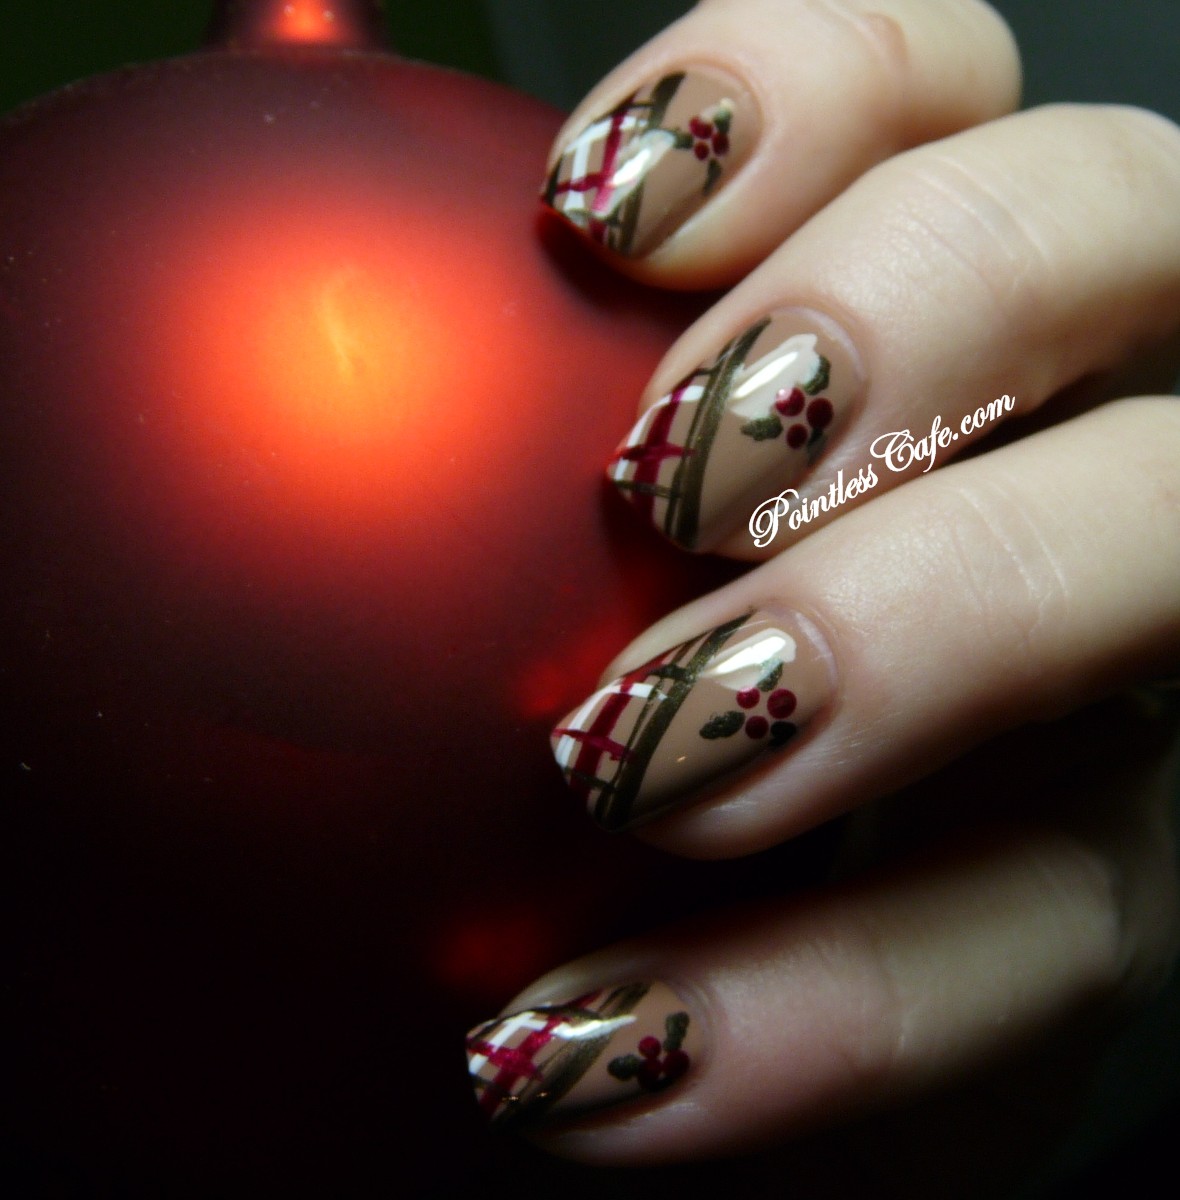
I received Chanel Malice in the mail yesterday (Christmas Eve) and I couldn't wait to put it on my nails! I had an idea in my head for nail art with completely different colors before I received Malice, so when I decided to wear Malice I had to think of something else. I fell in love with Sheila from Pointless Cafe's Christmas Plaid and Holly mani that she posted on Christmas Eve (link to the post here) and was inspired to try to replicate it. First, lets see the original.


Christmas Plaid and Holly Manicure from Pointless Cafe

I only did accent nails with this design since I was wearing Malice. (As a side note, my photos of Malice do not do this polish justice. I have a LOT of dark reds and none of them are like this. I don't even care for dark red polishes too much anymore but this one is definitely an exception.) My nail art didn't turn out as nice as Sheila's but I really enjoyed wearing this mani today!


Chanel Malice with Plaid and Holly

Chanel Malice with Plaid and Holly

Chanel Malice with Plaid and Holly

I used Nails Inc. Fulham Palace Road as the nude and Nails Inc. Emerald Street for the green.


Thanks for reading and happy polishing! ♥


.

Monday, December 24, 2012

Red Dog Designs Mister Grinch

Merry Christmas Eve to everyone that celebrates! I have a quick Christmas-themed mani for you this morning. I am hoping to squeeze in a couple of nail art designs today and tomorrow - I still have presents to wrap and baking to do though. Eek!

I am showing you my very first Red Dog Designs polish today - Mister Grinch. Appropriate for Christmas Eve, no? Mister Grinch is a glitter polish in a clear base with holographic shimmer running throughout. There are matte white, pastel green and red hexes as well as red hearts (because The Grinch ended up with a heart afterall!) - there are 7 different glitters in all in this polish. I love it!! I had no issues with application and all the glitters laid perfectly flat. How you see it is exactly how it came off the brush. I used one coat of Mister Grinch with 2 coats of Poshe. 

I love this over black so that's what I chose to wear it over. However,  I did want to try something a little different so I put it over Elevation Polish The Arches on my accent nail. It was cloudy (and cold!) when I took the photos and I couldn't capture the awesome holo shimmer. To see more pics (including ones that showcase the holo) visit Sheila's post at Pointless Cafe.

Red Dog Designs Mister Grinch

Red Dog Designs Mister Grinch

Red Dog Designs Mister Grinch

Red Dog Designs Mister Grinch

Gina, creator of Red Dog Designs, puts a lot of thought and care into each polish she creates. Make sure to check out Red Dog Designs' Facebook page and don't forget to check out her "About" section for pricing, ingredients and testing information, etc. You can also go to her shop here

I hope to see you all again later today! ♥


.
09 10